
Introduction and Quick Summary
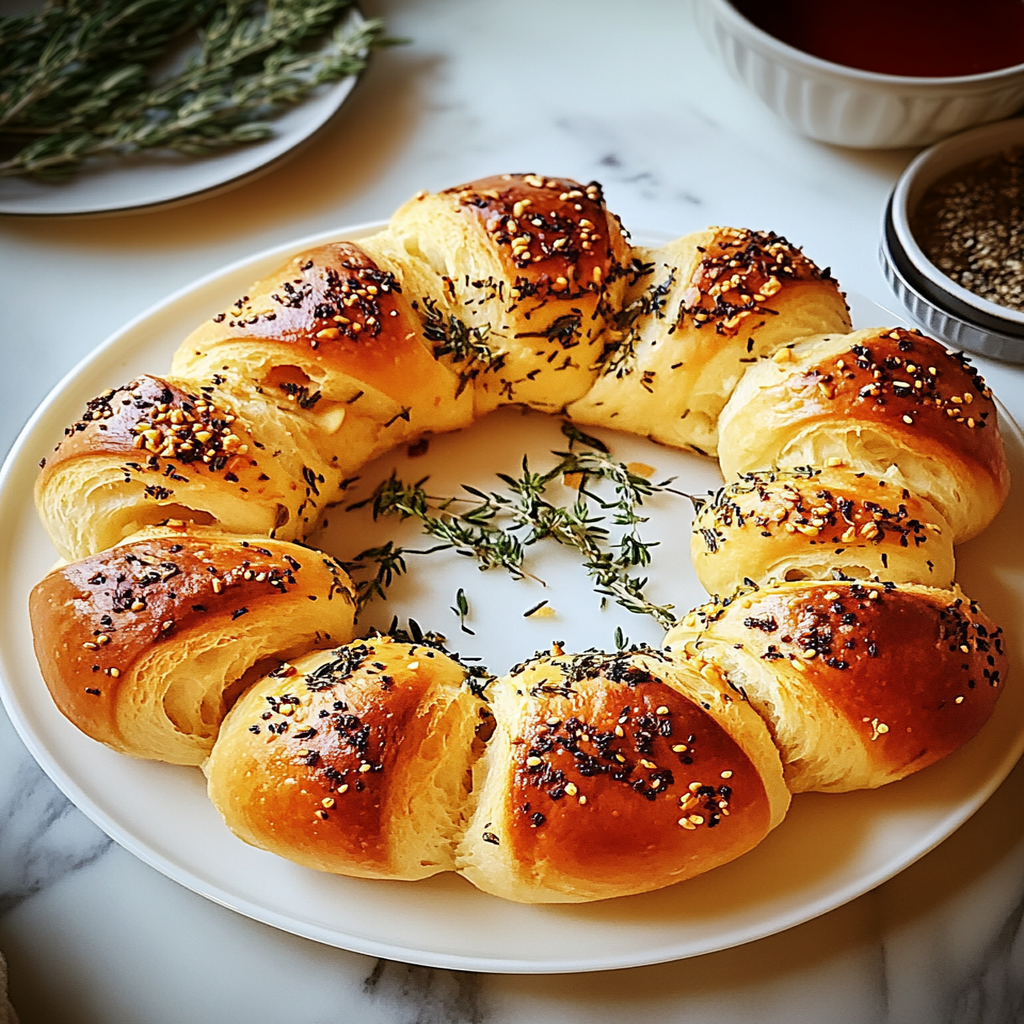
If you’re searching for a stunning centerpiece that also delivers an explosion of flavor, look no further than this Pull Apart Garlic Bread Wreath. This recipe combines the irresistible aroma of freshly baked bread with the rich taste of garlic and herbs, making it a crowd favorite for any gathering. Crafted to be both beautiful and delicious, this wreath is perfect for holidays, parties, or even as an appetizer at family dinners. Each piece is designed to pull apart effortlessly, allowing everyone to enjoy the warm, buttery goodness without any fuss. With minimal prep time and simple ingredients, you can create a dish that not only looks impressive but also tastes divine. Whether you’re hosting a festive occasion or simply want to elevate your weeknight dinner, this Pull Apart Garlic Bread Wreath will surely delight everyone at the table.
Why You’ll Love This Pull Apart Garlic Bread Wreath
-
Visual Appeal: The wreath shape creates a stunning presentation that makes your dish the star of any meal.
-
Shareable Fun: Perfect for gatherings, guests can easily pull apart their own pieces for a fun and interactive dining experience.
-
Customizable Flavor: You can easily modify the recipe by adding cheese, herbs, or spices to suit your taste preferences.

Perfect Results, Every Single Time! 🌡️
Never serve dry or undercooked food again. The Chef-X Digital Probe gives you an accurate temperature reading in under 3 seconds. It's the secret tool I use for perfect steaks, juicy chicken, and safe milk temperatures.
Ingredients for Pull Apart Garlic Bread Wreath
Here’s what you’ll need to make this delicious dish:
-
Frozen Bread Dough: Use about two loaves of thawed frozen dough for easy preparation and consistent results.
-
Fresh Garlic: Choose about 4-5 cloves of minced garlic for that robust flavor throughout the bread.
-
Butter: Melted butter helps achieve a golden crust while adding richness to each bite.
-
Fresh Parsley: Chopped parsley adds freshness and color; you may substitute with dried parsley if needed.
The full ingredients list, including measurements, is provided in the recipe card directly below.
How to Make Pull Apart Garlic Bread Wreath
Follow these simple steps to prepare this delicious dish:
Step 1: Preheat Your Oven
Preheat your oven to 350°F (175°C). While it heats up, prepare your baking sheet by lining it with parchment paper or lightly greasing it with nonstick spray.
Step 2: Prepare the Dough
Using kitchen scissors or knife, cut the thawed bread dough into small pieces approximately one inch in size. Place them in a large mixing bowl.
Step 3: Mix Butter and Garlic
In a separate bowl, combine melted butter with minced garlic and chopped parsley. Stir well until everything is evenly mixed.
Step 4: Combine Ingredients
Pour the garlic butter mixture over the dough pieces in the mixing bowl. Toss gently until all pieces are coated thoroughly.
Step 5: Form the Wreath
Arrange the coated dough pieces on your prepared baking sheet in a circular wreath shape. Leave some space between each piece for expansion during baking.
Step 6: Bake Until Golden
Place your wreath in the preheated oven and bake for about 25-30 minutes or until golden brown on top. For a crispy finish, turn on the broiler for an additional minute at the end.
Transfer to plates and serve warm, enjoying this delightful pull-apart treat straight from the oven!
Tips and Tricks
Here are some helpful tips to ensure the best results for your dish:
-
Thaw Properly: Ensure your frozen dough is completely thawed before using it; overnight in the fridge works best.
-
Baking Sheet Size: Choose a baking sheet that allows enough room for your wreath; too tight may hinder proper rising.
-
Add Cheese: For extra flavor, consider adding shredded mozzarella or parmesan cheese between dough pieces before baking.
How to Serve Pull Apart Garlic Bread Wreath
This Pull Apart Garlic Bread Wreath is versatile and pairs wonderfully with:
-
Rice or Potatoes: A hearty base that soaks up the delicious sauce.
-
Fresh Salad: Adds a crisp and refreshing contrast to the rich flavors of the dish.
-
Crusty Bread: Perfect for enjoying every last drop of the flavorful sauce.
Feel free to pair it with your favorite sides for a personalized meal!
Make Ahead and Storage
-
Make Ahead: You can prepare the dough for the Pull Apart Garlic Bread Wreath up to one day in advance. After mixing, let it rise until doubled in size, then shape it into a wreath. Cover it tightly with plastic wrap and refrigerate overnight. Before baking, allow it to come to room temperature and rise again for about 30 minutes.
-
Storing: Store leftover Pull Apart Garlic Bread Wreath in an airtight container at room temperature for up to two days. If you want to keep it longer, you can refrigerate it for up to five days. For best results, wrap it tightly in foil or plastic wrap before placing it in the container.
-
Reheating: To reheat, preheat your oven to 350°F (175°C). Place the bread on a baking sheet and cover it loosely with foil to prevent it from browning too much. Heat for about 10-15 minutes or until warmed through. You can also microwave individual pieces for about 20-30 seconds on high power if you’re in a hurry.
Suggestions for Pull Apart Garlic Bread Wreath :
Choose the Right Dough
Selecting the appropriate dough is crucial when making your Pull Apart Garlic Bread Wreath. You can use store-bought pizza or bread dough for convenience, but homemade dough offers a fresh taste and texture. Ensure that the dough is well-kneaded, as this helps to create a soft and airy wreath. If you’re using frozen dough, allow it enough time to thaw and rise properly before shaping. This extra step ensures that your finished product will be fluffy and delicious.
Don’t Overdo the Garlic
While garlic is the star flavor in your Pull Apart Garlic Bread Wreath, too much can overpower the dish. Aim for a balance by using fresh minced garlic or garlic powder in moderation. A good rule of thumb is to start with two to three cloves of garlic or one teaspoon of garlic powder for about one loaf of dough. You can always adjust based on your preference, but remember that you want to enhance the bread’s flavor, not mask it.
Mind Your Oven Temperature
Getting your oven temperature right is essential for baking the perfect Pull Apart Garlic Bread Wreath. Preheat your oven to 375°F (190°C) before placing the wreath inside. If your oven runs hot, consider lowering the temperature slightly to prevent burning. Baking at the right temperature allows the bread to cook evenly, creating a golden crust while keeping the inside soft and fluffy.
Be Generous with Butter
Butter adds richness and moisture to your Pull Apart Garlic Bread Wreath, making it irresistible. When preparing your garlic butter mixture, don’t skimp! Use at least half a cup of melted butter combined with minced garlic and herbs for optimal flavor. Brushing generous amounts of this mixture between each section of dough enhances taste while ensuring that every bite remains moist and satisfying.
FAQs :
What ingredients do I need for Pull Apart Garlic Bread Wreath?
To make a delicious Pull Apart Garlic Bread Wreath, you’ll need simple ingredients that you likely already have in your kitchen. Start with about two loaves of pizza or bread dough as your base. For flavoring, gather fresh minced garlic or garlic powder, along with unsalted butter for brushing on top. Fresh herbs like parsley or oregano work wonderfully as well. Lastly, prepare some grated cheese such as mozzarella or parmesan if you’d like to add extra richness to your wreath.
Can I make Pull Apart Garlic Bread Wreath in advance?
Yes! Preparing a Pull Apart Garlic Bread Wreath in advance is entirely possible and convenient for gatherings or parties. You can assemble the wreath up until just before baking it, then cover it tightly with plastic wrap or aluminum foil and refrigerate overnight. When you’re ready to bake, simply remove it from the fridge and let it come to room temperature before preheating your oven. This way, you’ll save time without compromising on flavor or freshness.
How do I store leftover Pull Apart Garlic Bread Wreath?
Storing leftover Pull Apart Garlic Bread Wreath correctly will help maintain its deliciousness for longer periods. Once cooled completely, wrap any leftovers tightly in plastic wrap or aluminum foil and place them in an airtight container. Keep them at room temperature for up to two days. For longer storage, consider freezing individual pieces wrapped in plastic wrap followed by aluminum foil; they will stay fresh for up to three months.
What can I serve with my Pull Apart Garlic Bread Wreath?
Pull Apart Garlic Bread Wreath pairs beautifully with many dishes! It makes an excellent side dish alongside pasta meals like spaghetti or fettuccine Alfredo due to its rich flavors complementing tomato-based sauces perfectly. You can also serve it as an appetizer at parties alongside marinara sauce for dipping or even complement it with salads for a light lunch option.
Conclusion for Pull Apart Garlic Bread Wreath :
Creating a delightful Pull Apart Garlic Bread Wreath requires attention to detail but yields mouthwatering results every time. Start by choosing quality dough and balancing flavors without overdoing elements like garlic or butter. Correctly managing oven temperature ensures even baking while generous amounts of butter keep each piece moist and flavorful. Feel free to prepare this wreath ahead of time and store leftovers properly so you can enjoy its scrumptiousness later on! Whether served as an appetizer or side dish at dinner gatherings, this dish will surely impress friends and family alike—making it a must-try recipe in any home kitchen!
Pull Apart Garlic Bread Wreath
- Total Time: 45 minutes
- Yield: Approximately 12 servings 1x
Description
Pull Apart Garlic Bread Wreath is the ultimate showstopper for your gatherings, blending the delightful aroma of freshly baked bread with rich garlic and herb flavors. This visually stunning wreath not only makes a beautiful centerpiece but also invites guests to enjoy the warm, buttery goodness piece by piece. Perfect for holidays, parties, or as an appetizer at family dinners, this recipe is simple to prepare with just a few ingredients. In less than an hour, you can impress everyone at your table with this easy-to-make dish that’s both fun and delicious.
Ingredients
- 2 loaves frozen bread dough (thawed)
- 4–5 cloves fresh garlic (minced)
- 1/2 cup unsalted butter (melted)
- 1/4 cup fresh parsley (chopped)
Instructions
- Preheat your oven to 350°F (175°C) and prepare a baking sheet with parchment paper.
- Cut thawed bread dough into one-inch pieces and place in a large bowl.
- In another bowl, mix melted butter with minced garlic and chopped parsley until well combined.
- Pour the garlic butter mixture over dough pieces, tossing gently to coat evenly.
- Form the coated dough into a circular wreath shape on the prepared baking sheet, leaving space between each piece.
- Bake for 25-30 minutes or until golden brown. For extra crispiness, broil for an additional minute at the end.
- Prep Time: 15 minutes
- Cook Time: 30 minutes
- Category: Appetizer
- Method: Baking
- Cuisine: American
Nutrition
- Serving Size: 1 serving
- Calories: 150
- Sugar: 0g
- Sodium: 190mg
- Fat: 8g
- Saturated Fat: 5g
- Unsaturated Fat: 3g
- Trans Fat: 0g
- Carbohydrates: 16g
- Fiber: 1g
- Protein: 3g
- Cholesterol: 15mg


Leave a Comment